Summer Projects...
Warning this is a long post with loads of photos!
If you are in any of the Facebook groups I'm on your will most likely have seen the first two projects in this post. Where I live in California we get very hot summers, and with the disadvantage of not have a "HVAC" (as my niece puts it) our front room stays cooler but our back rooms are boiling hot. The room that is set up as my sewing space/office/spare room gets very warm during the summer as does my mother's room they are both west facing. My room is East facing but still gets very warm. So spending hours in my sewing room is out of the question. I can spend a few hours in the very early morning but after about 10 am it is too hot to be in there.
That being said this year I decided that I would do a bunch of small projects that would keep me busy but also keep me out of the heat.
The first project I did was straight out of "Costume Close-Up: Clothing Construction and Pattern 1750-1790" which is a book released from Colonial Williamsburg. I choose to work on an 18th Century Black Linen Apron. I had just enough fabric to complete this project. The whole thing is hand sewn and I took my time so I have no idea how long it took to make. LOL
The apron came out alright... I can't wait to make it again in a chintz fabric.
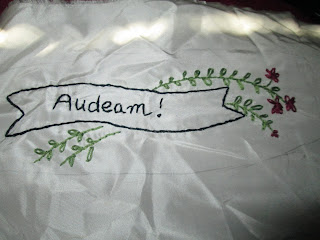
The second Summer hand sewing project I did is a lovely set of 18th Century Garters. I hand embroidered the design onto ivory silk. The silk is lined with canvas and backed with more silk and has grosgrain ribbon to tie off. I did use the machine to sew them up real quick. I used what little scraps I had left of this silk and am quite pleased with how they came out. The inscription is in Latin and reads "Fortune Favors the Bold" and the second one reads "Be Bold". Its a reminder to myself to not be so introverted whilst in costume.
The last project for now is an 18th Century Cap. The cap is I think from Country Wives but I am not one hundred percent sure as I borrowed it. :D As always I am a very visual seamstress and having something that doesn't have full illustrations makes it difficult for me. But Over all even with the misshaps the cap came out cute. My mother who doesn't normally comment on the things I make (other than to shake her head and tell me I'm silly) told me the cap was really cute. If you knew my mother you would realize that was high praise indeed. LOL I am going to order some Organdy and make this cap again only this time I'm going to increase the back portion a bit. I feel its on the small side. Please excuse the bathroom shots.
Randomly placed eyelets because I couldn't figure out the pattern. I did it right the first time then messed it up by second guessing myself.
Those who know me are probably wondering why the ribbon on this is ivory instead of some shade of blue (nearly all my costumes are blue... don't ask me why they just are. LOL) well here is the honest answer. I had a lovely shade of blue ribbon close to a sapphire shade, but it was only 1" wide instead of this 1.5" wide that I had left over from my Italian Reniassince gown (WHAT? I didn't write about that either... I really am bad at blogging). So "waste not want not" I'm trying. LOL
The above projects are all for my personal Costume Closet... but this next project was for a very sweet woman. She contacted me asking if I could make her a silk caul as she protrays Queen Elizabeth the First at a fair in Northern CA. I told her I would be more than happy to do that for her and the results are below. 'Simple Cauls' as they are termed are well very simple. I add a ribbon to my cauls to help cinch them in a little tighter.
The Silk for the Caul is a sort of coffee with cream color and has a gold grid on it with two different size of off white glass perals. I think it came out great and the costumer loved it!
That's it for now! I'll try to be a better blogger! But no promises!
Warmest Regards!
~Elizabeth


Comments